When using a Mac, managing your digital clutter is essential. The Trash folder on Mac is your digital wastebasket, like the Recycle Bin on Windows.
What Is the Trash Folder on a Mac and Where Can You Find It?
The Trash folder on macOS serves as a temporary repository for files you no longer need. Files placed in the Trash remain recoverable until you decide to empty it.
It’s essential to know where it’s situated to effectively manage your digital waste. The Trash is no longer visibly located on the desktop, but you can access it via the following methods:
- Using your Keyboard
- On your keyboard, press the “Command+Shift+G” keys simultaneously. This key combination will open a “Go to Folder” dialog.
- In the dialog box, type “Trash” and press Enter. This action will take you directly to the Trash folder.
- Locating the Dock Icon
- You should see an icon in the shape of a trash can in your Dock. This is the icon for the Trash folder.
- Click on the Trash icon, and a Finder window will open, displaying the contents of your Trash folder.
How to Empty Trash on Mac
Emptying your Trash folder is a crucial step in optimizing your Mac’s storage and maintaining its performance. Here’s how to empty your Trash folder through various methods:
- Method 1: Use the keyboard shortcuts Command+Shift+Delete and Command+Delete to move files to the Trash and subsequently empty it.
- Method 2: Click the Trash icon in the Dock and select “Empty Trash.” Confirm the action to free up space.
How to Retrieve Deleted Files on macOS
Similar to the importance of emptying your Mac’s Trash, to manage storage effectively, understanding how to recover deleted files on macOS plays a crucial role in safeguarding your valuable data.
- Click the Trash icon in the dock to open the Trash folder on your Mac.
- If you want to recover a file, right-click on it and select “Put Back.” The file will be returned to its original location on your Mac.
- To recover the entire contents of the Trash folder, use the keyboard shortcut “Cmd+A” to select every file in the Trash folder, then right-click on the selection and choose “Put Back.”
Recovering Emptied Trash on Mac
Emptying the Trash on your Mac may make it seem like you’ve permanently deleted your files, but in reality, they aren’t immediately removed from your storage.
What happens when you empty the Trash is that the operating system disconnects the pathways that allow access to these files, but the actual data remains on your storage device. These files are only truly gone when new data overwrites them.
As long as the data hasn’t been overwritten, there’s a chance to recover it using specialized data recovery software. However, it’s crucial to understand that once the files get overwritten, recovery becomes nearly impossible unless you have a backup.
If you accidentally empty the Trash, stop using your Mac immediately. Continued use makes it more likely that the files you want to recover will be replaced by new data, making them unrecoverable even with data recovery software.
Recovering Emptied Trash on Mac without Software
If you prefer not to use specialized data recovery software, you might still have a chance to recover your emptied Trash, provided you regularly back up your Mac. The key here is whether the deleted files are included in your backup. Keep in mind that your backups may not include recently created or modified data. Here are several ways to recover files from backups:
- Using Time Machine: Time Machine, a built-in backup and recovery tool on your Mac, offers the following procedure for restoring the Trash from a Time Machine backup:
- Connect the Time Machine backup media to your Mac.
- Launch Time Machine and navigate to the deleted items.
- Select the items you want to recover and click “Restore.”
- Using iCloud: To attempt recovery of accidentally emptied Trash using iCloud, follow these steps:
- Log in to iCloud.com.
- Click the gear icon to access the iCloud Settings.
- Scroll to the bottom and click on “Restore Files.”
- Select the recently deleted files you wish to recover and click “Restore.”
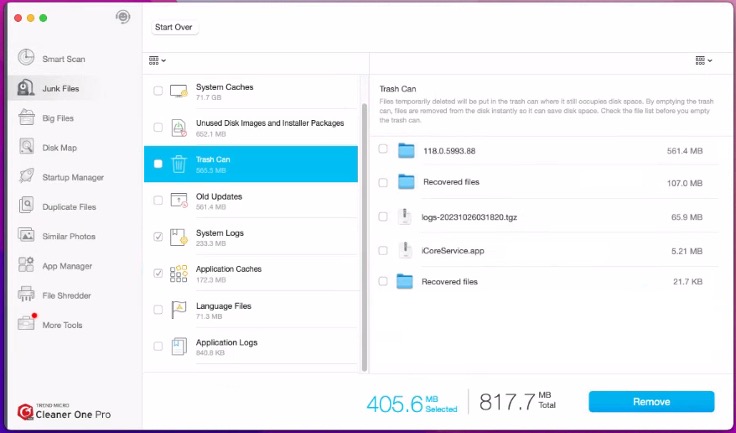
Clean the Trash folder with Cleaner One Pro
Trend Micro’s Cleaner One Pro will go through your entire storage drive and clean out everything unneeded that is slowing your Mac down — including the contents of the Trash folder. Cleaner One Pro includes several housecleaning tools, including:
- Memory Optimizer
- Junk Cleaner
- File Scanner
- Duplicate Files Finder
- App Manager
- File Shredder
- Memory Disk Map
These functions are all rolled into one easy-to-use interface for maximum efficiency and simplicity. Click the button below to download Cleaner One Pro for free.
0 Comments
Other Topics