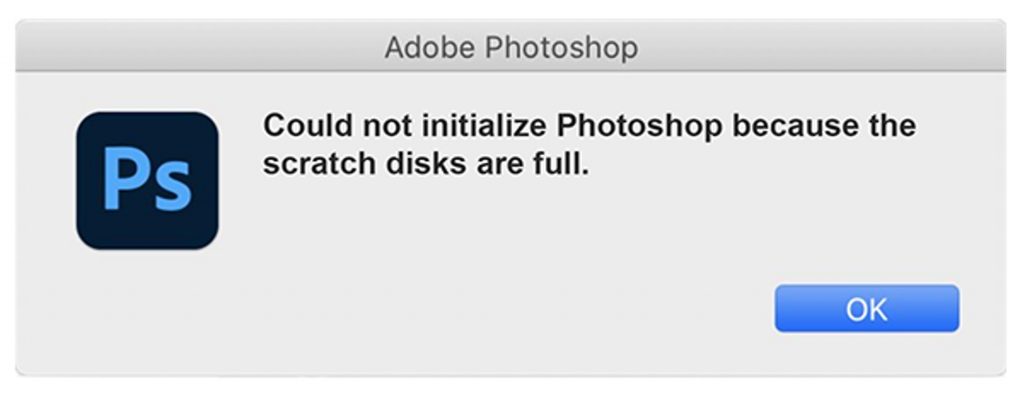
If you regularly use Adobe Photoshop, chances are at one point or another you’ve run into the “Could not complete your request because the scratch disks are full” error message. What causes this error message? How can you fix it? And what even is a scratch disk? If you’re asking yourself any of these questions, you’re not alone! Keep on reading for all the answers!
What is a scratch disk?
A scratch disk is a HDD or SSD that is used for temporary storage. Like other apps, Photoshop will store temporary files in RAM, but if the RAM is full or certain temporary files are too large, it will store them on makeshift memory known as a “scratch disk”.
Why am I seeing scratch disk full?
You are seeing the “scratch disk full” error message because you do not have enough free space on the drive your operating system is installed on — this is the drive that Photoshop will use for a scratch disk by default.
For Adobe Photoshop desktop, the minimum amount of space on a scratch disk should be 6GB, although it is recommended to have 20GB of free space on your OS drive.
How to fix the scratch disk full error
If you’re looking for a hassle-free fix to this problem, you’ll want to check out Cleaner One Pro. With Cleaner One Pro you can remedy the root causes of this error message in no time at all!
Cleaner One Pro is the easy way to fix this error, but if you would prefer to try your hand at resolving it yourself, check out the tips below.
#1 — Free up disk space
This is the most straightforward tip, but it’s good to get into the habit of doing it every now and then.
macOS has an excellent built-in tool for optimizing and freeing up storage space. To access it, click the Apple icon in the top-left corner > About This Mac > Storage > Manage.
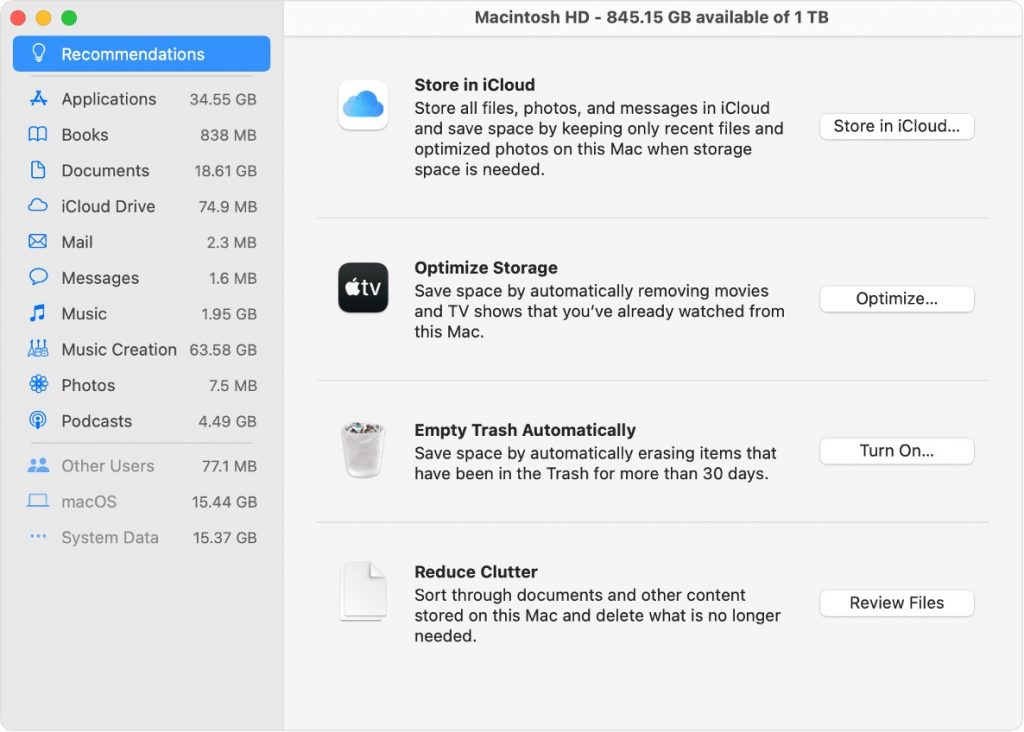
From here you’ll be able to free up disk space in a variety of ways. If you’ve never used this tool, or if you haven’t in a while, you’ll likely be very surprised at how much storage space you can free up using the Reduce Clutter feature. Store in iCloud is great for keeping your drive as clutter-free as possible, too.
#2 — Clean up Photoshop cache files
Note: Clearing Photoshop’s cache will remove previous versions of projects, so remember to save your current projects beforehand.
Clearing Photoshop’s cache will clear the scratch disk, resolving the “scratch disk is full” error message. Here’s how to do it:
- Open a project in Photoshop.
- Select Edit > Purge > All.
- Click OK.
- Repeat the steps for all other projects.
#3 — Remove temporary Photoshop files
You can use Finder to remove Photoshop’s temporary files, although it can be a little tricky. If you don’t consider yourself particularly tech-savvy, it’s recommended to give this method a miss. However, if you want to have a try, here’s how it’s done:
- On the desktop, from the menu bar, select Go > Go to Folder.
- Type “/tmp” into the dialog box and click Go.
- In the new Finder window that opens, find and delete the Photoshop temporary files by right-clicking on them and selecting Move to Trash.
All temporary files have a .tmp extension, so these are the ones you’ll want to delete. Photoshop temporary files will commonly have a series of numbers in their name. PhotoshopTemp174815 would be a typical name for a Photoshop temporary file, for example.
#4 — Change your scratch disk
If you would rather not delete any of your files on your OS drive, you can configure Photoshop to use a different drive as a scratch disk — although it will still need to have plenty of free storage space (a minimum of 6GB). Please note that if you want to use an external drive as a scratch disk, it will need to be plugged into your computer whenever you use Photoshop. To change your scratch disk, here’s what you need to do:
- Open Photoshop and select Photoshop in the top-left corner > Preferences > Scratch Disks.
- In the Preferences window that opens, deselect the checkbox next to your OS drive and select the checkbox next to the drive you want to use as a scratch disk.
- Click OK.
- Press Command + Option + Esc and force quit Photoshop.
- Open Photoshop again.
#5 — Reset your Photoshop preferences
Resetting Photoshop’s preferences can fix many different error messages, including the “scratch disk full” error. So, if you think you have enough space on your scratch disk, but you’re still getting the error message, resetting Photoshop’s preferences is worth a shot. To do so, follow the instructions below:
- Open Photoshop and select Photoshop in the top-left corner > Preferences > General.
- In the Preferences window that opens, select Reset Preferences On Quit.
- A dialog box will appear with the message “Are you sure you want to reset preferences when quitting Photoshop?” Click OK.
- Close and reopen Photoshop.
#6 — Free up RAM
It’s possible that because your RAM is heavily used up, Photoshop is over-relying on the scratch disk and causing this error message. Fortunately, in macOS there’s a really simple way to free up RAM:
- Open Terminal, type “sudo purge”, and press enter.
- Enter your macOS password and press enter.
Cleaner One Pro — it does it all!
If you don’t have any luck fixing the issue even after following all the instructions in this post, or you just want to be sure your Mac is running at its absolute best, you’ll definitely want to check out Cleaner One Pro. It’s free to download too so you’ve got nothing to lose! Click the button below.